Showing posts with label Concealer. Show all posts

Monday, July 20, 2015

Drugstore Superstars: Concealers

 Hey Glammies!  Welcome to the next installment of our Drugstore Superstar series!  This one is all about concealers.  Much like foundation, there is not one miracle concealer that is suited to everyone's needs... if there was, the company that sold it would make a killing!  So, I've broken down this post into categories, in order to help you find the best match for your needs.


Spot Concealer


For those of us with blemishes and imperfections to hide, L'Oreal True Match Super-Blendable Crayon Concealer ($8.95) is an absolute Godsend.  The thick, full-coverage formula is ideal for spot concealing and it's been my go-to for years (beating out all of its high-end competitors).  You may have seen it in action in my Summer Glow Makeup video tutorial, which is on our YouTube channel (if you haven't, go check the video out here!).  Its stick packaging not only makes it easy to apply, but also easy to throw in your purse for on-the-go touch-ups.  As you'll find with many other concealers, however, it's not really multi-purpose.  For instance, I would never use it for concealing under-eye circles since I find the consistency to be quite dry and because it does not blend as easily over the skin.  As with most cream products, be sure to set this product with powder if you want it to stay put on your face all day.

Under-Eye Concealer


I rarely suffer from dark circles or bags under my eyes, so I don't find myself reaching for this product as often as some others.  However, when I'm extra tired and my eyes need some help in order to perk up and look awake, I grab my Maybelline Instant Age Rewind Eraser ($9.99).  It comes in 6 shades and does a wonderful job of neutralizing dark purple shadows cast underneath the eyes.  The liquid formula is easy to blend (especially since most people have drier under-eye areas than the rest of their face), but it doesn't skimp on coverage.  On the other hand, I'm a bit torn on the sponge applicator because, although it does a great job of blending the product, I can't imagine that it's very sanitary since you can't remove the sponge to clean it.

Brightening Concealer


With the trend of highlighting and contouring your face becoming more and more popular, concealers that also highlight and brighten your features are becoming increasingly in demand.  For the cost-conscious, there's Maybelline Dream Lumi Touch Highighting Concealer ($7.99).  Its gel-based formula diffuses light, illuminates your skin and blends like an absolute dream!  Unlike other products that claim to do the same thing, it doesn't come off as streaky on the skin.  I wouldn't use it to conceal blemishes, however; not only does it provide very sheer coverage, but with the illumination factor drawing light and attention to the face, it may result in the complete opposite of what you're probably going for!  In other words, it may draw attention to any problem areas, as opposed to hiding them.

Color Correcting Concealer


I don't usually advocate the use of color correcting concealers for casual makeup users since they can be difficult to work with and because it takes practice to properly apply them.  However, if you have some skin issues that will not be covered up by regular, flesh-toned concealer, NYX Above & Beyond Full Coverage Concealer Jar ($5.00) is for you!  Here's a quick crash course on which colors do what:
  • If you want to conceal yellow discoloration (such as sallow complexions or yellow bruising), go for a lavender concealer;
  • If you want to conceal redness, go for a green concealer;
  • If you want to conceal purple discoloration (such as dark circles or scarring), go for a yellow concealer; and
  • If you want to conceal deep purple or blue discoloration and you have a deeper skin tone, go for an orange concealer.  (My fellow Glammie, Bex, mentioned this technique in her 1 Product, Multiple Uses blog post.)
This product is incredibly full-coverage and long-lasting, and a little goes a long, long way.  Just dab the product on your problem areas, layer your regular foundation over it and say goodbye to your hard-to-conceal spots!  These also come in more traditional flesh-colored tones for those of you that want a high-impact, full-coverage concealer that matches your skin tone.  Since they are so thick and high-coverage, it's not a consistency that I enjoy using all over my face, as they tend to make me look cakey, which is something I try to avoid as much as humanly possible!  Nevertheless, they have their place, so if your skin has any of problems that I mentioned above, you should give this product a whirl.

All-Purpose Concealer


Now, I know that I mentioned before I started this list that there isn't a concealer that is suited for everyone's needs, but bear with me.  The NYX HD Photogenic Concealer Wand is my absolute favorite drugstore concealer, and I have my freelance makeup kit stocked with every single shade.  It does a great job of concealing my blemishes and blends effortlessly under my eyes, and the lighter shades highlight my face perfectly.  Why on earth do I have this entire list of products if I use it for everything, then?  Because, as mentioned before, I don't really suffer from a great deal of face discoloration (especially after I put on foundation.)  This product has a light to medium coverage, which is all I really need, but some people might need more.

So, there they are, my concealer superstars from the drugstore!  If you want to check out the other blog posts from this series, click here.  Stay tuned for the next installment: Bronzers!

Glammie love!
~Jaz

Tuesday, April 28, 2015

1 Product, Multiple Uses!

Have you ever gone on vacation or been in a rush and forgotten your go-to products? And it isn't until you're already at the airport that you realize your cosmetics are in the makeup bag next to your front door, which was strategically placed there so that you didn't forget it...yeah, I haven't done that either!  In all seriousness, I have forgotten my go-to products before and realized it in the car ride to the airport or at my hotel room. Or maybe you have the memory of an elephant (take that as a compliment) and have never forgotten any product, right down to your teal eyeliner, which you may or may not use with the outfit you have planned for Sunday Brunch.  If the latter description is you, then maybe your makeup bag is weighing you down! Bottom line, no matter which category you fall under, this blog post may be helpful.

I have scoured the Internet, and now, I think I have a great collection of some I tips I already knew, some that I'm still playing with and some that I can swear by!  So, maybe you can rethink whether you need to bring all that makeup with you, or maybe, after reading this, you'll be able to make the best of what makeup you did remember to pack!

Lipstick Is The New Hero for Dark Circles!

Apparently, there is some serious science behind this.  If you look at a color wheel, you will see that orange-red is opposite from blue, and combining the two will cause color neutrality.


iStockphoto / Via Getty Images

Picking out the right color of red-orange or coral lipstick is something to play around with. The deeper your skin, the more reddish orange you can work with.  If you have a more medium or tan complexion, try to go more toward a warm coral, or if you have a light complexion, try a more yellow, peachy shade (and, if you are in this boat, maybe a color concealer would work better than lipstick).

The Blondeshell / theblondeshell.com

I've noticed that, if I go with a straight red, even after I blend it well, I still see a hint of pink popping out. A warm coral color is my go-to! Also, if you have the color you need in a cream lipstick, go with that, as compared to a matte lipstick, just because it's easier to blend.  Make sure you do the lipstick first with an eye shadow brush, and then put your foundation, concealer and powder on top in order to set it.  I like to blend my foundation and concealer with a beauty blender sponge.  This trick also works for any dark pigmentation left over from acne scars.  Now, you can say bye-bye to dark circles and spots!

Deepica Mutyala / Via birchbox.com

Highlight Like The Golden Goddess You Are!

The key to using an eye shadow as your highlighter is all about shimmer and not glitter.  Shimmer is a shade that will give you a luminous, subtle sheen.  Glitter is all about the sparkle, with tons of little particles reflecting light.  Unless you're a little girl throwing a princess party, you do not need any glitter on your face, unless of course you are Kesha (in which case, do your thing!).  I hope that most people who have eye shadow palettes have one of Urban Decay's Naked Series (if you don't, other neutral palettes will work, but we are using the Naked Series as a convenient example).  If you do have a Naked Series palette, either Naked or Naked 2, then you have a pan called Half Baked, which is the golden-bronze swatch with a shimmery finish. Use a highlighter brush and give your cheeks that soft glow!


Sephora.com / Urban Decay Naked 2 Palette

Matte Is In... In More Ways Than One!

Matte lipstick and matte eye shadow are both components of a current and ongoing trend.  The best part of this trend is that you can use your matte eye shadow as a brow filler.  Taupe (Warm Taupe) works well for blonde and silver/white brows. 


For brunettes, I would stay away from warm browns and go more towards an ashy brown (Rich Brown). I'd suggest a warm brown (Hot Chocolate) for auburn hair because the warm tone will look more natural than an ashy brown color.  And lastly, if you have brown black or jet black hair, I would stick to a charcoal brown (Smoke). All of these eye shadows, which I linked, are $12.00 on the Anastasia Beverly Hills website, except for the Warm Taupe, which can be purchased at your local Macy's in the Anastasia Beverly Hills pop-up store.  Or if you want to test the colors before purchase, head to the closest Macy's and test to see if these are the right shades for your brows!  The key is to find a neutral shade and to avoid any shadow with a shimmer or satin finish.  (Unless you're rocking the teal hair trend... in which case, don't let me stop you by telling you what color to do your brows!)
Anastasia Beverly Hills Eye Shadows

Get yourself a small Z Palette, and you can call this your matte eye shadow/brow palette!


Prime Those Eyes With Concealer!

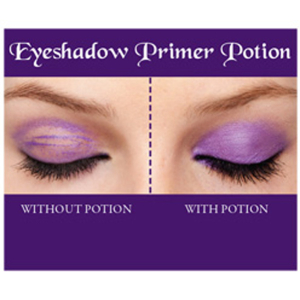
Do you see an oily shine on your eyelids that is looking back at you in the mirror?  You, my friend, may be suffering from oily eyelids, which means you cake if you don't prime!  Years ago, Urban Decay (as seen in the picture below) solved this problem with the eye shadow primer, but there have been times where I definitely forgot to pack this with me when I traveled.
Urban Decay Eye Shadow Primer

Fear not because your concealer has got your back!  Stick to a heavy-duty cream concealer, which will fill your crease better than a liquid concealer.  I use my Benefit Boi-ing to take over when I forget my eye shadow primer.  I personally use my finger, but you can use your brush.  Just make sure you apply an even, and let it dry a bit before you start adding your shadow.  After that, may the power of makeup last all day for you!  Of course, I do recommend that you always use a setting spray (Model in a Bottle) to help your makeup last all day!

Go forth makeup lovers and enjoy these tricks!

Glammie Love,
Bex