Thursday, October 23, 2014

First Youtube Video!

Hi Glammies!
So excited to get to know you all out there and for you all to get to know us! We are already learning so much, we cannot wait to grow with you! Look no further, consider this your one stop shop to anything beauty related! Don't forget to subscribe!


Products featured on Jaz

Primer: Too Faced Hangover Rx and Smashbox Photo Finish Pore Minimizing
Foundation: Revlon Color Stay Whipped Foundation in Caramel
Concealer: Nars- Radiant Creamy Concealer in Caramel
Contour: Estee Lauder Bronze Goddess in Deep
Highlighter: Hourglass Ambient Lighting Powder- Radiant Light
Eye Primer: Mac Pro Longwear Paint Pot in Soft Ochre
Eyeshadow: Morphe Brushes 35 Color Warm Palette
Eyeliner: Inglot Cosmetics Gel Eyeliner in 77
Eyelashes: Velour Lashes- WHISPIE ME AWAY
Brow: Anastasia Beverly Hills in Dark Brown/ Brunette
Brow Sealer: Anastasia Beverly Hills Brow Gel- Clear
Lipstick:  Maybelline Color Sensational Creamy Mattes in Divine Wine
Finishing Spray:Model in a Bottle Makeup Setting Spray- Matte Finish


Products featured on Bex


Saturday, October 18, 2014

e.l.f. Studio Moisturizing Lipstick

I don't know what it is about Target, but every time I walk in to buy a few things, such as laundry detergent, dog treats, Advil, etc., I always end up finding myself in the beauty aisle, trying to see if e.l.f. has put out anymore new and affordable products.  Great job, Target, for carrying this brand, you get me every time!

At this time, Target has started carrying (in-store only) five different shades of their Moisturizing Lipsticks, $3.00 each.  But if you don't live anywhere near a Target, you can still order it from the e.l.f. website, also $3.00 each.  The great thing about buying from the website is that you get to pick from ten shades!  However, if you absolutely cannot wait and want to run to the store and pick these babies up, here are the five shades Target offers:


From Left to Right: Pink Minx, Ravishing Rose, Rosy-Go-Round, Cheeky, Red Carpet


From Bottom to Top: Pink Minx, Ravishing Rose, Rosy-Go-Round, Cheeky, Red Carpet 

That shine means moisture!  All shades that I show are with lipstick only, no lip liner or gloss. Hopefully, this gives you an idea of how the pigmentation enhances the color without help from any other product.

Pink Minx

When I think of Pink Minx, I think of Bubblegum/Barbie Pink.

The thing about loving Barbies growing up is finding myself always drawn to them; the bad thing about Bumble Gum/Barbie Pink is that it doesn't look good on my lips.  Out of the five shades, this one is the most transparent.  I tried to layer it, but it just made them look more pale.  I think it would look great on someone with a lighter skin tone or for use as part of an ombre lip.


Ravishing Rose

This shade was my favorite until I tried Red Carpet, but I still absolutely love this shade!


It smells like there is cocoa powder, and as I applied it, it reminded me of the smell of Too Faced The Chocolate Bar Eye Palette.  Though its tempting, do not eat it! And if you have kids, make sure they don't eat it either!


Rosy-Go-Round

This is a shade you wear when you want to go out and enjoy some night life.  If you want a hot pink shade that's more deep than neon, then this is the shade for you!

It doesn't come across as a deep hot pink, but trust me it is!  It reminds me of a deeper shade of my Sephora Collection Rouge Cream Lipstick Mr. Lover, which Sephora describes as a bright fuchsia (although I think it's more of a neon hot pink).  Anyhow, if you are not feeling the neon and want a darker shade than the Rosy-Go-Round, this is the choice for you!


Cheeky

Cheeky is the most metallic shade.  If you played the "which of these things isn't like the other" game (with these five shades), this would be this shade that wins.  After all, unlike the rest, it's not in the pink or red family.

However, if you want to rock the bronze goddess look, this is definitely the shade. It gives such a nice, shimmery color.


Red Carpet

Lastly, there is one shade that steals the spotlight: Red Carpet!  Red Carpet is red hot.  It's sexy, it's bold, it demands attention!  This shade inspires confidence.


Similarly to Ravishing Rose, I get a hint of cocoa powder.  Just remember, as anyone who took High School Dance or was on the Dance Team knows, the cardinal rule is to use red lip liner.  It's highly recommended when wearing red lips because red lips smudge and smear easily.  I had to be extra careful to apply this without liner.


Overall, I'm pretty happy with these lipsticks,  I cannot wait to play them up with liner and gloss!
 Stay tuned for the next time Target and e.l.f. launch new products!

Till Next Time Glammies,

Bex

Thursday, October 9, 2014

Air Travel Essentials - Part 3 of 3

Well, here it is... The final installment of my Air Travel series!  If you haven't read part one or two, you can just click on these links: Part 1, Part 2.

What more do I have to impart to y'all, you ask?  Well, it occurred to me that this is a makeup-centered beauty blog, so I would be remiss if I didn't include any sort of makeup in the series.

I'm going to be honest: I usually don't put makeup on after a long plane ride.  Travel in and of itself is tiring and stressful, so I don't usually feel like putting much effort toward my appearance until after a hot shower.  After all, who do I have to impress?  I'm married!  (I'm joking, of course... I'm a firm believer in the notion that makeup is not to impress others, but to make yourself feel beautiful and confident.)  Nevertheless, there have been a few times where I felt like putting on some pre-baggage claim makeup was a necessity.  It's usually when I have to head to a meeting or an event right after landing, with no time for a stop at the hotel.  For these times, I have a simple makeup routine that I use.

Post-Flight: Looking Fresh-Faced

When putting on makeup at the airport, I'm not trying to look like a Kardashian.  Even though everyone knows that I love to contour my face, there's a time and place for that, and an airport bathroom is definitely not it.  I just try to make myself look bright-eyed, fresh-faced and well-rested (even when I'm not any of those things).   I need products that aren't only easy to pack, but also easy to use and that don't require a lot of tools.

From Left to Right: Smashbox Camera Ready CC Cream, NARS Radiant Creamy Concealer, Too Faced Perfect Eyes Waterproof Eyeliner, Smashbox Waterproof Kohl Liner, Anastasia Beverly Hills Brow Wiz, Vincent Longo Lip/Cheek Gel Stain, Too Faced Better Than Sex Mascara, Estee Lauder Bronze Goddess Bronzer and BH Cosmetics Kabuki Brush
This photo might as well be titled "Jaz's Must-Have Makeup Products."  I swear by every single one of these products, but I do realize that they can be pricey, so I will also list a drugstore alternative for all you thrifty glammies.  Also, while I usually advocate for using brushes because they're more hygienic, I realize that it's probably not convenient in this case, which means applying with my clean fingers, unless otherwise stated.  Anyway, here's what my simple airport makeup would look like:

This look is simple, effortless and only takes about 5-10 minutes!
Y'all should know by now that I strongly promote hydrating your skin after being on a plane, and it doesn't stop when I put on my makeup.  I tend to favor a CC or BB cream like this one by Smashbox ($42) over a traditional foundation because it hydrates much like a moisturizer would, while still evening and perfecting my skin.  A great drugstore alternative would be the Maybelline Dream Fresh BB Cream ($7.19).

After putting on my CC Cream, I highlight my under-eye area with my NARS Radiant Creamy Concealer ($29) to brighten up my eyes, as well as dabbing a little on my forehead, chin and cupid's bow.  A drugstore alternative for this would be Maybelline Instant Age Rewind Eraser Concealer ($7.99).

I feel like a defined brow really makes a girl look effortlessly put together, and the Brow Wiz ($21) is the hands-down best product in the market for this.  The formula of the pencil glides on easily without smudging, and the little spooly brush on the end helps to brush the hairs into place.  The alternative to this product would be the Revlon Brow Fantasy ($5.91).

I love eyeliner.  I actually have been known to walk out of the house wearing nothing on my face but eyeliner, and I felt completely put together.  For this particular look, I take Too Faced Perfect Eyes Waterproof Eyeliner ($18), line the outer half of my eyes and smudge it a little on the ends.  CoverGirl Perfect Point Plus ($5.69) would also do the trick.  Just for extra oomph, I hit my waterline with a nude eyeliner, which makes my eyes look even bigger.

Vincent Longo ($22.50) makes one of the best lip and cheek stains that I've ever used.  I love stains because they look effortless, but I dislike them because they tend to be drying.  This one is one of the very few stains that don't dry out my lips.  The best part is that it can be dabbed on the cheeks, and you can use it as a blush!  I love multi-purpose products for traveling!  The drugstore option for this item is the Revlon ColorStay Moisture Stain ($7.99).

Bronzer is a completely optional part of this makeup look.  I personally prefer to just touch the outside of my face with bronzer to slim it, but I realize that it's not for everyone.  If you were to use bronzer, my favorite is the Estee Lauder Bronze Goddess Powder ($36.)  I also like the Maybelline Fit Me Bronzer ($4.40).  I apply my bronzer with the BH Cosmetics Kabuki Brush ($11.01), which I love for travel because, even though it's dense and fluffy, it comes at a great price and even includes a cute little leather carrying case.

Of course, no look is complete without some mascara to make your peepers pop.  I never thought that the Better Than Sex Mascara ($23) by Too Faced would ever be topped on my list, but it seems that L'Oreal's Voluminous Miss Manga Mascara ($7.99) is giving it a run for its money.

There you have it!  That's all of my air travel tips!  Thanks for sticking with me for all three of these posts... I know that they're super long.  I hope you found at least a couple of tips that were helpful.  Happy flying!

Glammie Love,
Jaz

Wednesday, October 8, 2014

Air Travel Essentials - Part 2 of 3

Welcome back to my air travel essentials!  This specific blog post is about what you can do to nourish your skin and stay healthy while you're in the air.  This blog is part of a series, so if you haven't read part one yet, you can find it here.

In-Flight: Stay Hydrated

The humidity level in the cabin of an airplane usually averages between 10 and 20 percent, which is much lower than the typical indoor humidity of between 30 and 65 percent (#science).  Not only is dry skin a factor in premature aging, but it's just plain uncomfortable and itchy... That's why it's very important to stay hydrated during the flight.  I have a few tried and true tricks to do so.

Step 1: Cleanse, baby, cleanse!

Once I'm settled in my seat, I try to treat the plane as my own mini-spa, where I keep myself entertained and cozy and take care of my skin.  My first step is to take off any and all makeup that I have on my face.

From Left to Right: Nourish Organic Moisturizing Face Cleanser
and Neutrogena Cleansing Towelettes
I love to keep this particular cleanser in my little carry-on cosmetic case.  First of all, it's small enough to get past airport security, it's organic (so no harsh chemicals to strip your face of its natural oils) and it includes the moisturizing effects of cucumber!

Of course, washing your face with soap and water is the best, but sometimes we're not blessed with an aisle seat and easy access to the airplane lavatory.  In these particular cases, I pull out my trusty Neutrogena Cleansing Towelettes.  These towelettes are a holy grail item for me, as they take off every stitch of makeup... even waterproof mascara!

Now, I realize that not every flight is a long-haul flight, and sometimes, you want to come off the plane looking like you stepped out of a magazine.  By all means, you can definitely leave your makeup on for as long as you wish; the only thing that I recommend is to leave the mascara off of your face.  Mascara is the most susceptible to dry conditions since it tends to flake and come off into your eyes - something that nobody wants!  I would just keep your mascara in your purse and put it on when the pilot tells the cabin that he's starting his final descent.

Step 2: Drink Plenty of Water

I feel like this one's a no-brainer, but since it's important, I'm going to stress it anyway.  Bottom line: the best way to stay hydrated is to drink water.  It's tempting to order something carbonated or alcoholic (probably both) when the stewardess comes down the aisle, but these types of drinks just don't hydrate you nearly as much as plain old water.  I always try to buy a bottle of water in the airport before I board because you never know when a steward/stewardess will come down the aisle, especially when everyone else on board is sleeping.  However, if you do forget to buy some water beforehand, which is what happened to me on my last flight to South Africa, all is not lost.  You better believe that I parked myself in the galley and downed about nine or ten of those tiny glasses of water that they hand out while I had a pleasant conversation with the stewardess.  I stayed hydrated and got an extra pillow out of the deal, so I have to say it was a win-win situation.  There's no reason you can't do the same!

Step 3: Moisturize

After a couple of hours into a long-haul flight, most people settle in to sleep, read or watch another episode of The Big Bang Theory.  This is the perfect time for me, on the other hand, to really get my in-flight spa going.  Enter my favorite cabin-ready products:
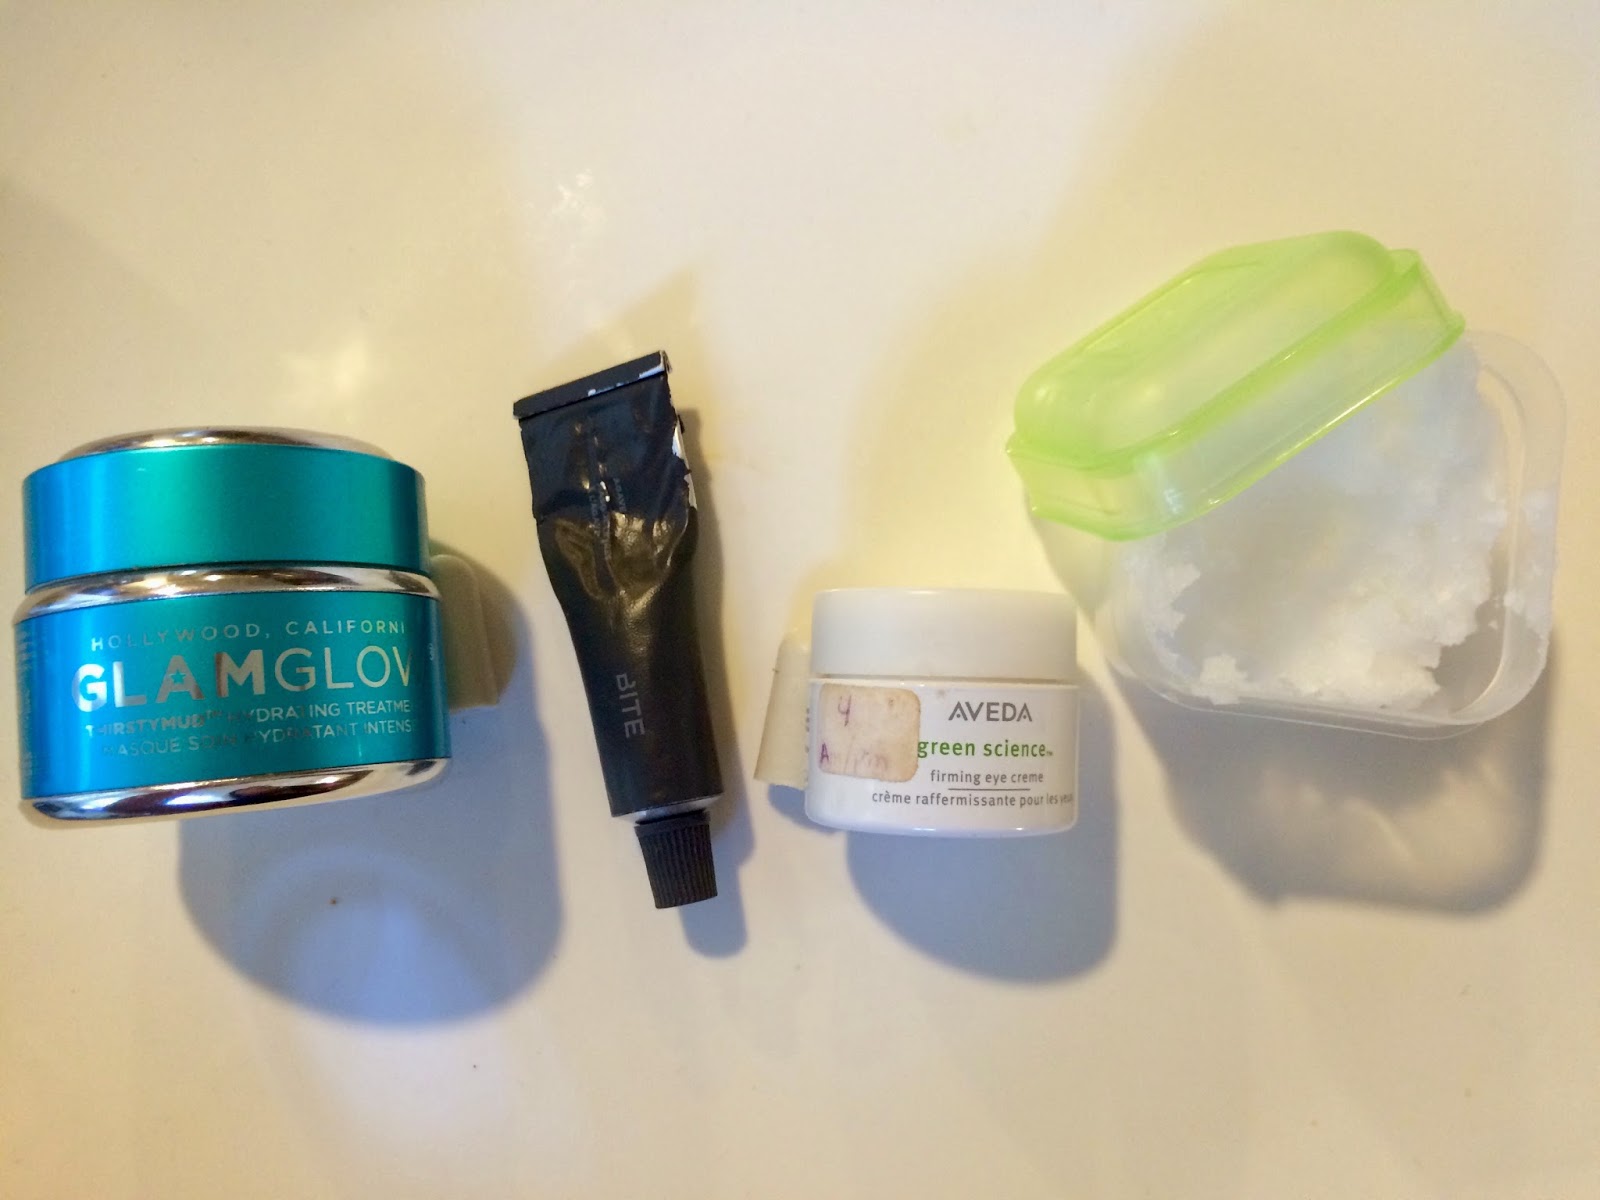
From Left to Right: GlamGlow THIRSTYMUD, Bite Beauty Agave Lip Mask, Aveda Firming Eye Cream and Coconut Oil
If I had to go onto a long-haul flight with only one product, I would definitely take my THIRSTYMUD.  Sometimes, after all the makeup, cleansing and exfoliating, our skin just needs a little boost of hydration.  Consider this your boost.  I usually put it on Sunday night (after neglecting my body for an entire weekend) and wake up on Monday morning with my face feeling soft, supple and youthful.  On flights, I slather this all over my face and let the mask work its wonders.  Thankfully, it's cooling, smells divine - sort of like coconuts and vacation - and it goes on relatively sheer, so you won't get any weird looks from people passing by.

My next essential is the Agave Lip Mask from Bite Beauty.  Annoying, chapped lips are definitely a thing of the past since I've been using this product.  I hate having any sort of lip treatment slide around my lips and face, so I love this product for its thickness.  It won't budge off of your lips and lasts for hours, which means that you won't have to keep reapplying.

The skin around your eyes is about a tenth as thick as the rest of your face, which means it can wrinkle a lot more easily.  Thus, because it's so delicate, the under-eye area needs to be treated as a separate entity, and it needs its own moisturizer.  The Firming Eye Cream from Aveda is one of the best eye creams I've tried because it goes on smooth, doesn't irritate my skin or my eyes and works on my eyelids as well.

Last, but certainly not least, is a little travel-sized tub of coconut oil.  You could say I'm a bit addicted to this stuff because I use it in everything from skin treatments to hair treatments and even in some recipes!  Because it's multi-purpose, it's perfect for travel.  I usually leave this treatment for last and put it all over my arms, elbows and hands.  Sometimes, when my hubby is feeling especially sweet, he'll give me a little hand massage with it (that's my super-deluxe spa treatment!).  I've also been known to rub a little bit on my fingers and run it through my hair to prevent fly-aways.

So, there you have it!  These are my in-flight beauty secrets.  Stay tuned for the final installment of this blog series tomorrow!

Glammie Love,

~Jaz

Tuesday, October 7, 2014

Air Travel Essentials - Part 1 of 3

I like to joke around with everyone that I've spent half of my life in the clouds.  I grew up in an expat family, so that meant that we moved every couple of years, which is something that I wouldn't trade for the world.  I've seen many places, experienced many cultures, met many people... and sat in many airplanes.  Luckily, my husband shares my passion for travel, so my travel experiences haven't stopped with marriage, and in fact, I'd actually venture to say that they have only increased.

Anyhow, seeing as how I've traveled pretty extensively, I'd like to think that I'm decently knowledgeable when it comes to air travel.  I'm not talking about actually flying a plane of course, or the physics allowing a 5 ton hunk of metal to soar through the air without crashing, but the art of sitting on an airplane for hours on end without going insane.  My biggest goal when I was younger was to make sure that I didn't get bored in the air; now, my biggest goal is to not get sick and to keep my body from turning on itself.

Everyone knows that being on an airplane is not a healthy environment.  The high altitude, coupled with the low humidity and the recycled air, can wreak havoc on your body - especially on your skin.  Luckily, through some trial and error, I think I've perfected a beauty regime for flying.  This will be a three part blog series: Pre-Flight, In-Flight and Post-Flight.

Pre-Flight: Prepare Yourself

Step 1: Cleanse Your Skin

I have very temperamental skin.  My face tends to break out at the slightest bit of change in my routine, whether it be in my diet, my hormones or my environment.  When I know that I'm about to get on an airplane, especially if it's a long-haul flight, I try to prep my skin as best as I can.  This means that I try to extract all the bacteria and gunk out of my pores before it gets further irritated by my surroundings while in-flight.  I have a few favorite masks for this:

From Left to Right: GlamGlow Powermud, Proactiv Skin Purifying Mask,
GlamGlow Supermud and Proactiv Refining Mask
GlamGlow's POWERMUD Dual-Cleanse Treatment is my absolute favorite mask to use on a weekly basis.  It acts like a regular mud mask and is super deep cleansing, but it turns into an oil after you rinse it off to moisturize your face.  Basically, it leaves your skin super clean and feeling velvety smooth.  You can pick it up here or here.

Proactiv's Skin Purifying Mask is also a great medicated clay mask for use on acne-prone skin.  I do, however, prefer to use it as an overnight spot treatment as I don't like the tightening effect that it has on my face.  When I dab it on a problem area at night, I wake up the next day, and it's gone... miracle!  Buy it here.

GlamGlow's SUPERMUD Clearing Treatment is multiple award-winning and by far the most intense mud mask I've ever used.  I can actually see the gunk coming out of my pores (so gross!).  The only problem is that it's pretty drying, so I only use this one when my skin is behaving especially badly.  Grab it here or here.

Proactiv's Refining Mask works a lot like their skin purifying mask, but I feel like it's a bit more potent.  The only problem is that the sulfur smell is also more potent, so for those who don't mind the smell, this one works amazingly well.  Otherwise, I would refer you to the SUPERMUD.  Anyhow, you can try it out for yourself here!

Step 2: Moisturize

After I thoroughly cleanse my skin, I make sure that I completely moisturize my skin to prepare my face for the climate of the plane.  Seeing as though I usually use masks at night, I prefer to use a face oil afterwards.  I feel like my skin absorbs it better and more quickly than a lotion, so it ends up on my skin, as opposed to my pillow.  I only need 3 or 4 drops of this stuff for my face to feel completely nourished!

Tarte Pure Maracuja Oil: My favorite face oil ever!  You can buy it here!
Step 3: Boost Your Immune System

I'm not really a germaphobe per se, but when I'm flying, I do want to do my part to ensure that I don't get sick from all the germs in the air.  Usually, an adventure is waiting for me at the other end of my plane ride, and adventure isn't as fun when you're sick.  Enter my favorite germ-fighting duo: Vitamin C and hand sanitizer (I haven't added a picture of these since I'm not really partial to any one particular brand.)  I also take a vitamin before I head out to the airport and make sure to keep my hand sanitizer handy (pun intended) in my purse or carry-on at all times.

Now that you're cleansed, moisturized and boosted, you're ready to board!  Look out for Part 2 in this series tomorrow: In-Flight Essentials.

Glammie Love!

~Jaz