Thursday, April 21, 2016

Drugstore Superstars: Blushes

 The whole idea of blush is to mimic a healthy glow.  It all depends on your skin tone, but the right blush can make you look awake, alive and impossibly refreshed... like you just came from a day at the spa.  The problem with many drugstore blushes is that they can come off chalky and unblendable, or they have so little color payoff that it's almost impossible to see.  That's why I'm super impressed with these blushes.  Like the other blog posts in this series, I'm going to divide them up by category, so it's easy to figure out which product meets your needs.


Best Matte Blush: NYX Ombre Blush ($10.00)


Daaaaamn, NYX! Back at it again with the awesome products!  These blushes have only been on the market a few months, but they've shot straight up onto my must-have list.  Not only are they amazingly pigmented and easy to blend (a requirement to be on this list) but I love that the ombre effect actually gives you options for color.  NYX officially wants you to swirl your brush around the whole product to mix the light and dark colors together, but if you want something a bit darker, just dip your brush in the lower portion of the compact and the opposite goes for the higher portion of the compact.  3 blushes in 1!  Who doesn't love that?

Best Luminous Blush: Milani Baked Blush ($8.49)


Ok, this little endorsement comes with a bit of a caveat.   For those of you that don't like the look of a matte blush and prefer a bit of a healthy sheen, I think that SOME of the blushes in this line are fabulous, and others are kind of duds.  Let me explain.  A good luminous blush will quite literally illuminate and wake up your skin.  It should give you a youthful and almost dewy flush of color.  In order to create that illusion, the product needs to have a nice sheen and sparkle, and sometimes instead of putting in a finely milled sort of sparkle, companies will opt for the cheaper option of chunky glitter.  Now don't get me wrong, I love glitter as much as the next drag queen, but I don't want it anywhere near my cheeks - I'm not 13 anymore.  That brings me to the Milani Baked Blushes.  The majority of them have glitter in it.  I don't know why they chose to only make a couple without, but that's definitely the case.  I do have to point out, that even though they do have glitter in them, it's quite easy to buff it away once it's actually on your face, so it's not a complete lost cause.  Having said that, the shade Luminoso is GORGEOUS!  Being an almost exact dupe for the cult-favorite NARS Oragasm, I actually prefer Luminoso to it's much more expensive counterpart.  It has a peachy coral shade that is universally flattering on almost all skintones.  I, in fact, reach for Luminoso almost exclusively when I'm doing other people's makeup.  Since I do have a darker skintone, I do need to layer Luminoso quite a bit in order to get it to show up on me, so I usually end up using either Belissimo Bronze or Terra Sole (they are the darker versions of Luminoso with the least amount of glitter.)

Best Cream Blush: Maybelline Master Glaze Blush Stick ($9.99)


For those of you that prefer to work with creams, Maybelline has a great cream blush that comes in an easy to use stick.  Just swipe on your cheeks and blend with your fingers or a brush... what could be easier than that?  These have a gorgeous luminosity to them without any glitter and they have a light consistency to them that makes you feel like you're not wearing anything at all!


Best Blush Palette: e.l.f. Powder Blush Palette ($6.00)


I love any kind of makeup palette.  I love them so much that I actually depot the majority of my single makeup products and condense them into a Z Palette.  They're easier to work with, easier to pack up, easier to travel with, easier to mix colors with... they're just easier!  There actually aren't very many drugstore blush palettes on the market, so when I saw that e.l.f. came out with two, I rushed to my nearest Target to check them out.  As with all e.l.f. products, the price point can't be beat - it's already cheaper than the first three blushes on this list!  But what really impressed me was the pigmentation.  I'm not really that big of an e.l.f. fan... I usually feel that even though the price is amazing, there's always something wrong with either the pigmentation or blendability (something that's pretty common for drugstore products.)  But man, they made me eat my words with this one.  There are two different palettes to choose from, Light and Dark, and within those two palettes, there are four different blushes.  I prefer the Dark palette not only because the colors match my skintone better, but I feel like the products are a bit less chalky than those in the Light.  I'm going to tell you right off the bat, that one of the blushes has glitter in it and I hate glitter in blush (see above) so I could do without that shade.  The others, however, pack one heck of a punch!  I'd say start with a light hand, because these babies are PIGMENTED but they glide across the skin beautifully and blend like a dream!

Best Bang For Your Buck: Wet n Wild Color Icon Blush ($2.99)


I would be remiss if I failed to mention the O.G. of the drugstore blush world - the Wet n Wild Color Icon.  These matte blushes were the best on the market for so long, and it's really not that hard to see why.  They're super pigmented, blend beautifully and last all day long.  They were recently reformulated to be softer to the touch, and while I appreciate that, this has increased the product's fallout upon application.  For this reason, NYX has dethroned these blushes as my favorite.  The price, however, still makes it a great option for those looking for a good matte blush.

That's it!  Those are the best drugstore blushes on the market right now!  Which ones are your favorites?  Check out the other posts in this series here.

~Glammie love!
Jaz

Tuesday, March 22, 2016

Glam Destination Tries: DIY Bath Bombs

Hello Glammies!

If you're reading this, you probably are either 1) an aficionado for bath time 2) like to save money, or 3) both! 

That being said, welcome to the club!

I can not remember the last time I had a bath.  For the past 5 years, I have either had a shower stall or a bathtub without a plug. Now that I find myself with a tub to fully enjoy, the first thing I wanted to do is run out and spend my entire paycheck on some wonderfully scented Lush Bath Bombs!  That was until I got an email saying my credit card statement was ready for payment and I saw the amount that was due... well there goes that idea! So, I figured that DIY Bath Bombs were the "winner winner chicken dinner" option. Not only would I have a yearly supply of bath bombs, but these cute bombs make great homemade gifts (hint: the wedding season time). I believe with some practice it seems possible to create fun shapes, such as muffins bath bombs!


Now that it was decided that Jaz and I wanted to experiment making bath bombs, and it was time to research. Luckily for us, Jaz was able to find an awesome bath bomb starter kit on Amazon! Thank you Amazon, can't remember how life was like before your existence! 

Image taken from Amazon.com sold by Bath Bomb Kit Co.

The packaging is too cute, and if you're too lazy or have no time (drying time calls for 2 days) to even attempt to make bath bombs to give as gifts, you can literally give them the box with its contents as the gift! Think of it like buying someone a puzzle, but more relaxing and rewarding!

The majority of these ingredients can be found at your local mega supermarket, and if you can't, there's always Amazon! Because of the mold, spray bottle, and mini essential oils, and exact measurements provided in this kit, I recommend first timers to go ahead and buy the kit, and then by the restock ingredients for your next batch. This kit makes approximately 15-20 bath bombs. It is a lot more than the 12 it says it makes on their Amazon page! 

The recipe is pretty straight forward, and as long as you read the instructions, you should not have any problems. Only note I would make is make sure you count how many spritzes of  water you put in (we counted in sets of ten in order to not lose count) so you can slowly see the binding of the ingredients without activating the key ingredients. Also if you're going to use a decorative, such as food coloring, don't use gel food coloring. We used gel which was hard to mix, so I think you may have better luck with liquid food coloring.


I recommend trying to save this recipe somewhere safe if you order the kit, or shameless plug,
bookmark this blog to be able to come back to it time and time again!

Watch our short video below for a demonstration:


After 2+ days of drying time, see the results below:


Aren't these the cutest favors and homemade gifts? Tag GlamDestination on Instagram to see your DIY Bath Bombs!

Thanks for stopping by!

Glammie love,

Bex

Tuesday, January 19, 2016

Drugstore Superstars: Bronzers

Hey Glammies!  I'm sorry that I've taken so long to continue this series; to be completely honest, it's just that I've really been dreading this particular post.  I've decided that finding a good bronzer at the drugstore is next to impossible.  In an effort to duplicate the glow of freshly tanned skin, most products have glitter in the formula.  While it may look good swatched on your arm, it's not wise to make your face look like a disco ball.  Yes, there are a few matte bronzers, but they unfortunately don't have very much color variety.  As I have tan skin, most don't even show up on me.  I've searched far and wide and came up with this list of bronzers that are "good enough" for me.  I have yet to find my holy grail, but don't worry... I'll keep looking!

Wet n Wild Coloricon Bronzer ($3.99)


Officially, this bronzer comes in 3 shades: Reserve Your Cabana, Bikini Contest, and Take Me to Brazil.  However, I can't imagine who would be pale enough to use Reserve Your Cabana as a bronzer.  It's simply too light (it would be a good highlighter though!).  So, with that in mind, this bronzer really comes in two shades.  Therein lies one of the main problems that I have with drugstore bronzer: there isn't enough shade selection.  The darkest shade, Take Me to Brazil, isn't really dark enough for me to use as a bronzer per se, but when I dust it on my skin, it does provide a nice, luminous, just-got-back-from-the-beach glow.  That brings me to what I love about this product, which is the formula.  As I said before, I feel like it's hard to find illuminating bronzers at the drugstore because they usually have chunky glitter in them.  I was a bit worried when I saw the pan because it looked like there were pieces of glitter, but it doesn't actually translates when you put it on.  The texture is buttery smooth, it applies effortlessly and it has great staying power.  It has a nice sheen to it that mimics a dewy, luminous complexion,  Meanwhile, with SPF15, and checking in at a price point of $3.99 for a larger than standard compact, it's definitely one of the best values around.

NYX Matte Bronzer ($9.00)


As far as drugstore bronzers go, this one is my favorite,  It is very pigmented, easy to apply, blends amazingly and doesn't fade throughout the day.  If I love it so much, why did I say that I have yet to find my holy grail?  Again, it comes down to shade selection.  I realize that it seems a bit silly for women of color to use bronzer, since they're already tanned, but it's actually one of my favorite products to use because a good bronzer has the ability to shape, sculpt and bring definition to a face... who wouldn't want that?  In store, I've only ever seen this particular bronzer in 3 shades: light, medium and deep tan.  Deep tan works as a bronzer for me, but how about the girls who are darker than me?  I'll step off of my soapbox in just a second, but lack of variety for women of color is definitely something that I always get reminded of when I go makeup shopping.  Having said this, I feel like I should mention that, while it seems like I'm crucifying drugstore products, the high-end companies are also guilty.

(I'd like to note that, apparently, this bronzer comes in 5 shades, not 3, as I originally thought.  Unfortunately, the 2 darker shades are only available online at nyxcosmetics.com, and Ulta doesn't even carry them.  This being a blog post about products that you can pick up in store, my point still stands.)

L'Oreal True Match Powder ($10.95)


I know that this powder is technically not a bronzer, but I would be amiss if I left off the product that I use the most for contouring.  If you've read my post about drugstore foundations, you've already heard me sing this powder's praises.  (If not, check it out here.)  The great thing about using a face powder as a bronzer is that there are a ton of colors from which to choose, and you can even pick the undertone.  If you would like to use the bronzer just around the perimeter of your face, in order to warm up your complexion, you can pick a shade with a warm undertone.  If you would like to use it to contour, you can pick a shade with a cool undertone, which can mimic shadows on your face.  The key is to get a shade just a couple shades darker than yours, and you'll be able to sculpt out your cheekbones and define your other features in no time.

So, there you have it!  My drugstore bronzer superstars!  If you want to check out the other blog posts from this series, click here.  Stay tuned for the next installment: Blushes!

Glammie Love!
~Jaz

Tuesday, October 20, 2015

Which Brush Should I Use? - Part 3 of 3

Welcome to the final chapter of the series, hopefully after this you can continue your makeup journey with more knowledge than ever! Please refer to the last 2 chapters if you need a refresher! Here and Here!

This final chapter will feature brushes 25-36 from BH Cosmetics 36 pc Ultimate Brush Set.


Item 25: Angled Shadow Brush
This brush is great if you like to use powder products on your brows. I'd use this for a more natural brow look. If I wanted more dramatic brows or "brows on fleek", I would instead use an eyeliner angle brush to shape my brows.

Item 26: Blending Brush
If you do not want to buy the entire set, I strongly recommend you at least buy this brush or a few of them, so you don't have to clean brushes so often haha! This is the key to beautifully blended smoky eyes! Or the key for a beautiful blended transition shade. Basically anything you want to blend beautifully, you use this brush! THIS IS A MUST HAVE!

Item 27: Short Shadow Brush
When you see people talk about brightening the inner corner of their eye, this is a great brush for that. It's small enough to just get in that inner corner and not mess up anything else. Look at BunBun Makeup Tips site, she does a great job of highlighting the inner corner of her eye. You can really see the difference and how much it opens up the eye!


Item 28: Angled Blending Brush
This is another one of my favorite brushes, even though I only use it for 1 purpose, which is to highlight my brow bone. It does the best job of blending and highlighting the brow bone at the same time. It really helps in the shaping your brows and completes your eye makeup.

Item 29: Large Shadow Brush
Just another general brush to use when you put eyeshadow on your lid. You can wet it to get a different shade than just using it dry.


Item 30: Foundation Brush
This brush is used for cream and liquid foundation, you wouldn't use this brush with powder foundation. When I use this brush I still like to use a beauty blender to make sure my foundation is even. And if you have a wide areas to apply concealer you can also use this brush too!

Item 31: Small Blush Brush
Pretty self explanatory, use this for your blush products. It picks up a great amount of product so make sure you tap off the excess blush before applying it to your cheek bones. Remember to start lightly and build up, because if you put on too much blush, then you'll have to keep blending it out with another clean brush and some foundation powder. 

Item 32: Large Angle Blush Brush
If you want more control with your blush, you can use this brush. I personally like to use my contour powder with this brush. The angled bristles helps shape your cheekbones when contouring. I really like how it blends and defines your cheek bones at the same time. 

Item 33: Highlight & Contour Brush
This is mainly used for cream highlighters and contour. I actually do enjoy using this for powder highlighters too, its very sharp in its application when you use a powder highlighter, the product only goes on where you applied the brush. So don't overdue it!

Item 34: Duo Fiber Stippling Brush
The intention of this brush is to buff your foundation into your skin to give you that airbrush finished, but (and its a big but)I don't feel like it really works. I know Wayne Goss did an amazing tutorial of this on YouTube, but he has perfect skin already (despite what he thinks) and my pores must be too big and my skin must have too much texture to get this technique to work on me!


Item 35: Powder Brush
This is a great face brush when working with loose foundation powder. This is what you use instead of the Foundation Brush, when working with loose powder. For example, if you use Bareminerals for your foundation you would use this brush.

Item 36: Large Fan Brush
Just like you would use your small fan brush, this is the jumbo version. You can use it to apply highlight to your cheekbones or nose. Or you can use this to help removed loose shadow that has fallen on to your skin without smudging your face!


This completes the 3 part series!
I hope this helps you know what the heck some of these brushes are used for!
Have fun playing!

Glammie Love,
Bex


Thursday, September 3, 2015

New Product Review: NYX Liquid Suede Cream Lipstick

I FINALLY got them, Glammies!  It seems like the new NYX Liquid Suede lippies have been actively avoiding me since they launched in late July.  It's mostly my fault - I totally blanked on the release date and of course they were all sold out by the time I remembered about them a week later.  It's all good though!  They recently released on Ulta.com and are still available for purchase.  So, for a little bit of background on the product, I'm going to let NYX tell y'all all about them:
Doll up your lips in plush and vibrant color! Our Liquid Suede Cream Lipstick glides on and sets into a striking matte finish. Velvety soft and waterproof, this long-lasting lippie creates a positively polished look with every swipe.
I'm in!  It's no secret that I'm in love with liquid lipsticks and I have been ever since the old school CoverGirl Outlast All-Day Lipcolor that came out in high school.  If you're a makeup junkie like me, you'll already know that NYX already has an incredibly line of matte liquid lipsticks called the Soft Matte Lip Creams, so what's the difference?  Well, the formula for these are more like the classic liquid lipsticks, in that they are supposed to be waterproof and long lasting, which the Soft Matte Lip Creams are not.  They come in 12 shades:

  • Stone Fox;
  • Life's A Beach;
  • Cherry Skies;
  • Soft-Spoken;
  • Orange County;
  • Sway;
  • Sandstorm;
  • Pink Lust;
  • Tea & Cookies;
  • Amethyst;
  • Kitten Heels, and finally;
  • Vintage
At $7 a pop, the price is certainly great, especially if you compare them to similar and very popular liquid lipsticks from Anastasia Beverly Hills or Kat Von D ($20.00 each).  I bought 9 of the 12 colors so that I could get a good sense of the color payoff and wear, and swatched them down below.


Overall, I would say that I like these lippies.  I'm in love with a couple of them (I'll expand on that later), but I don't feel like the entire line is a must-have.  

Let's talk about the formula first.  I did find it to be a lot more long-wearing than the Soft Matte Lip Creams, but they're still a lot more comfortable to wear than most liquid lipsticks.  Now, keep in mind that with something this long-wearing, the dry feeling on your lips is unavoidable.  With that being said, my lips didn't feel nearly as dry with these as they do with other liquid lippies, so there's a positive right there.  These did take a while to dry fully though, with some of them taking up to 5 minutes!  That's entirely too long for me to wait for my lips to set, and when they finally did, they weren't a completely matte finish.  The finish isn't a negative thing per se, but NYX did market them as so, so I was expecting a matte finish and not a satin one.  

Before I get into each individual color, I do want to put up a disclaimer: Although they are a liquid formula and thus more opaque than regular lipsticks, skin tone does need to be taken into account when looking at the color payoff.  I have a dark medium complexion with olive undertones (Mac NC35-40 depending on how tan I am), so please keep in mind that some colors may look a bit different on other people.  By the way, I didn't use a lipliner in any of these pictures, so y'all can get a sense of the true color of the lippies.

Love it or Leave it


Life's A Beach 

Life's A Beach is a true coral color.  I really didn't like the color because I felt like it looked almost neon against my skin, but it would look great on people much fairer than I am.  I found it to be really streaky in application, and I had to put on several coats to get some even color payoff.  After it set, I saw that it settled into the fine lines and was starting to patch.  LEAVE IT


Cherry Skies

This is a dark, wine red that I absolutely loved! I tend to gravitate towards these kinds of colors, so I knew that this one was a must have for me.  I didn't find it to be nearly as streaky as some others, but I did have to apply 2 coats to make the color even and opaque.  It's a great, vampy color for fall! LOVE IT


Soft-Spoken

This is a dusty pinkish brown color.  I was most excited for this particular lippie, because I felt like it would be the perfect pinky-nude color for me.  I was right!  It's hands-down my favorite out of the entire line.  I didn't have any trouble whatsoever with the application, and I was more than happy with the opaqueness and color payoff with just 1 coat.  LOVE IT


Sandstorm


Sandstorm is a true nude-brown that I had very high hopes for.  Unfortunately, the color was a little too cool and too close to my skin color for my liking.  However, I think it would be a gorgeous nude lippie for someone that's lighter than me, (I'm looking at you, Bex!)  I didn't have any problems with streakiness, but I did feel like it wasn't as opaque as Soft-Spoken.  This one is definitely a 2 coater. LOVE IT (just not on me.)


Pink Lust

Helloooo Barbie pink!  Although I wouldn't wear it on a regulr basis, this one is such a fun color, and incredibly bright.  Bright and opaque from the first swipe, you only need one coat for this lippie.  I did 2 for this picture because I wanted it to be hot, hot pink.  LOVE IT


Tea & Cookies

This was another disappointing one for me.  It's a light blush, baby pink color (it's advertised as pinky-nude but definitely not for my skin.)  This was another one that was incredibly patchy and streaky.  It had all the problems that I had with Life's A Beach, plus I couldn't get it to be opaque enough.  No matter how many coats I put on, I couldn't hide my natural lip color from peeking through.  LEAVE IT


Amethyst

This one is a true royal purple with a blue undertone.  Like Pink Lust, I wasn't expecting to be able to wear this color on a daily basis, but I feel like it's a fun color for those bold enough to wear purple lips.  Unlike Pink Lust, however, this one was surprisingly streaky even when I didn't apply too much pressure on the wand.  I had to put on 3 coats to even the color out.  LEAVE IT


Kitten Heels

Kitten Heels is a true, bright red with a blue undertone.  This one surprised me the most!  I don't usually like bright reds, because they tend to look orange on me, but I feel like this one stayed true to color.  It definitely had the best coverage out of the bunch and was perfectly opaque and smooth with just one application.  I'm a bright red lippie convert!  LOVE IT


Vintage

Vintage is a dark burgundy, almost plum color.  I know I'll be wearing this one quite a bit in the fall months because it has just enough brown undertone to make it bold but wearable.  This one was interesting in application though... I found this one to be streaky as well.  Luckily, it's such a dark color that it can hide all manner of sins, so it's not as obvious.  The streakiness threw me off a bit, but the color is so beautiful that I LOVE IT


Overview


Well there you have it!  Overall, I like these new NYX lippies... I just would leave some of the lighter ones on the shelf.  Do y'all have any of these?  How did y'all like them?  Let me know in the comments!

Glammie love!
~Jaz

Tuesday, August 11, 2015

Which Brush Should I Use? - Part 2 of 3

This portion of the blog will feature items 13-24 and is the second part of a three part blog series.
If you missed the first part of the blog series featuring items 1-12, click HERE to view.


Pictures from BH Cosmetic Website of the 36 Ultimate Brush Set.
Item 13: Eyeliner  Smudger/ Eyeliner Smudge Brush
This is another brush I absolutely hate. It reminds me of when smoky eyes were also the popular thing to do in the early 2000's. You would use that jumbo eyeliner stick and the poke and prod your eyelids harshly to blend and smoke out the eyeliner with this tapered hard sponge brush. This is a pass, there are better smudge brushes in this kit. As you can see I am not a fan of sponge brushes when applying eye makeup! Also the "smoky eyes" look has tried to make its comeback into the spot light since Urban Decay released it's new Naked Smoky Palette. Let's face it the smoky eye look has never really left, it just isn't always featured in the spotlight.

Item 14: Round Angle Smudge Brush
I'd use this brush for smudging out the crease line, typically you would use a darker color on your crease than your lid. Since this has and angle to it, you could also use it the highlight your brow bone. I prefer to use item 28 as a highlighter to my brow bone, but if you have smaller lids than me, than this is the small version of the brush.
Item 15: Lip Brush
A lot of people swear by lip brushes, they feel more control using a brush than using the actual lipsticks tube for application. I'm old school, where as I still like applying lipstick directly from its tube. However, if you are doing lip makeup on different people, I recommend using the brush because its more hygienic.

Item 16: Concealer Brush
This brush is great to use for cream concealers. If you don't use a stick highlighter or liquid concealer wand to contour, then this is the brush you would use for application. Just make sure you conceal in an upside down triangle under your eyes and not an upside down crescent moon. That technique will brighten your face and give you a better glow. To help blend it into your skin, I do recommend using a beauty blender to make it more of a natural glow.
As featured on Makeup and Beauty Buzz Blog

For your convenience of not having to keep scrolling up I will keep featuring this image.

Pictures from BH Cosmetic Website of the 36 Ultimate Brush Set.
Item 17: Short Smudger Brush
This is my favorite type of smudge brush, because 1- its not a hard sponge and 2- the bristles really do smoke out your bottom lower lash line. And because the brush bristles are shorter and flatter it doesn't take long to blend.

Item 18: Small Concealer Brush
This is great when you want to concealer small blemishes and small discolorations such as hyperpigmentation. This brush is pretty much made to dab the concealer onto your minor problem area.

Item 19: Smudge Brush
Can you wrap your head around all these different smudge brushes yet? The great thing about having all these smudge brush options is now you can play around to see which one is your favorite, for example mine is definitely item #17. But this brush works too, I just prefer #17 because it seems to get me the results I want faster. This brush gives you more more precision, I would use this as a crease smudger than a lower lash line smudger.

Item 20: Small Smudge Brush
This brush is smaller and works best with powder products for exact precision to the crease for a diffused, yet controlled finish and placement. Which is the reason this brush has more of a pointed tip.

Item 21: Crease Brush
Its a good tool to use for cut creases. After you would line your eye with the liner pencil, to blend out the crease I would use the tool. As seen in the darker shade by iinala.


Pictures from BH Cosmetic Website of the 36 Ultimate Brush Set.
Item 22: Flat Shadow Brush
This is a good tool if you want to use shadow as a liner, the flat feature of this helps with the lining of your eyes.

Item 23: Round Flat Shader Brush
This one is a little confusing, because I would only use it for spot treatment of concealer but then I wouldn't use it to blend, I would have to use a sponge to blend it or a different brush. And because I can just use a small concealer brush to do the spot treatment, I wouldn't want to dirty another brush just for spotting.

Item 24: Eye shadow Brush
If you're new to make up, this is probably the one brush you recognize. Probably because any makeup set you buy will have this brush. Its known for brushing or patting down eye shadow on your lids. I've used it before to highlight the bridge and button of my nose. Its a definite brush to have in your go to makeup brush set. You may even want to stock up and have a couple of these so you don't have to wash it all the time.

Thanks for reading the second part of this blog series. I hope you find this helpful, and just remember just because I use a brush a certain way doesn't mean its the only way! Go have fun and play! Just  make sure to come back  for the last portion of the series!

Glammie Love,

Bex


Monday, July 20, 2015

Drugstore Superstars: Concealers

 Hey Glammies!  Welcome to the next installment of our Drugstore Superstar series!  This one is all about concealers.  Much like foundation, there is not one miracle concealer that is suited to everyone's needs... if there was, the company that sold it would make a killing!  So, I've broken down this post into categories, in order to help you find the best match for your needs.


Spot Concealer


For those of us with blemishes and imperfections to hide, L'Oreal True Match Super-Blendable Crayon Concealer ($8.95) is an absolute Godsend.  The thick, full-coverage formula is ideal for spot concealing and it's been my go-to for years (beating out all of its high-end competitors).  You may have seen it in action in my Summer Glow Makeup video tutorial, which is on our YouTube channel (if you haven't, go check the video out here!).  Its stick packaging not only makes it easy to apply, but also easy to throw in your purse for on-the-go touch-ups.  As you'll find with many other concealers, however, it's not really multi-purpose.  For instance, I would never use it for concealing under-eye circles since I find the consistency to be quite dry and because it does not blend as easily over the skin.  As with most cream products, be sure to set this product with powder if you want it to stay put on your face all day.

Under-Eye Concealer


I rarely suffer from dark circles or bags under my eyes, so I don't find myself reaching for this product as often as some others.  However, when I'm extra tired and my eyes need some help in order to perk up and look awake, I grab my Maybelline Instant Age Rewind Eraser ($9.99).  It comes in 6 shades and does a wonderful job of neutralizing dark purple shadows cast underneath the eyes.  The liquid formula is easy to blend (especially since most people have drier under-eye areas than the rest of their face), but it doesn't skimp on coverage.  On the other hand, I'm a bit torn on the sponge applicator because, although it does a great job of blending the product, I can't imagine that it's very sanitary since you can't remove the sponge to clean it.

Brightening Concealer


With the trend of highlighting and contouring your face becoming more and more popular, concealers that also highlight and brighten your features are becoming increasingly in demand.  For the cost-conscious, there's Maybelline Dream Lumi Touch Highighting Concealer ($7.99).  Its gel-based formula diffuses light, illuminates your skin and blends like an absolute dream!  Unlike other products that claim to do the same thing, it doesn't come off as streaky on the skin.  I wouldn't use it to conceal blemishes, however; not only does it provide very sheer coverage, but with the illumination factor drawing light and attention to the face, it may result in the complete opposite of what you're probably going for!  In other words, it may draw attention to any problem areas, as opposed to hiding them.

Color Correcting Concealer


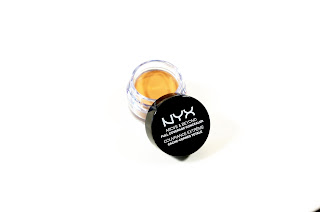
I don't usually advocate the use of color correcting concealers for casual makeup users since they can be difficult to work with and because it takes practice to properly apply them.  However, if you have some skin issues that will not be covered up by regular, flesh-toned concealer, NYX Above & Beyond Full Coverage Concealer Jar ($5.00) is for you!  Here's a quick crash course on which colors do what:
  • If you want to conceal yellow discoloration (such as sallow complexions or yellow bruising), go for a lavender concealer;
  • If you want to conceal redness, go for a green concealer;
  • If you want to conceal purple discoloration (such as dark circles or scarring), go for a yellow concealer; and
  • If you want to conceal deep purple or blue discoloration and you have a deeper skin tone, go for an orange concealer.  (My fellow Glammie, Bex, mentioned this technique in her 1 Product, Multiple Uses blog post.)
This product is incredibly full-coverage and long-lasting, and a little goes a long, long way.  Just dab the product on your problem areas, layer your regular foundation over it and say goodbye to your hard-to-conceal spots!  These also come in more traditional flesh-colored tones for those of you that want a high-impact, full-coverage concealer that matches your skin tone.  Since they are so thick and high-coverage, it's not a consistency that I enjoy using all over my face, as they tend to make me look cakey, which is something I try to avoid as much as humanly possible!  Nevertheless, they have their place, so if your skin has any of problems that I mentioned above, you should give this product a whirl.

All-Purpose Concealer


Now, I know that I mentioned before I started this list that there isn't a concealer that is suited for everyone's needs, but bear with me.  The NYX HD Photogenic Concealer Wand is my absolute favorite drugstore concealer, and I have my freelance makeup kit stocked with every single shade.  It does a great job of concealing my blemishes and blends effortlessly under my eyes, and the lighter shades highlight my face perfectly.  Why on earth do I have this entire list of products if I use it for everything, then?  Because, as mentioned before, I don't really suffer from a great deal of face discoloration (especially after I put on foundation.)  This product has a light to medium coverage, which is all I really need, but some people might need more.

So, there they are, my concealer superstars from the drugstore!  If you want to check out the other blog posts from this series, click here.  Stay tuned for the next installment: Bronzers!

Glammie love!
~Jaz